Set-up Guide – AlgoAuto Plan - Algo Index – Automated Algorithmic Trading
Quick Map (for your information only) AlgoIndex (TradingView strategy) │ (sends JSON via alert) ▼ TradingView Alert — "Order Fills" → Webhook URL │ ▼ TradersPost Strategy (Options) → Your Broker (Paper first) What You’ll Need Part A – TradersPost Setup Follow the exact order shown below (matches the screenshots). Start with AlgoIndex Stage 1, […]
Quick Map (for your information only)
AlgoIndex (TradingView strategy)
      │  (sends JSON via alert)
      ▼
TradingView Alert — "Order Fills" → Webhook URL
      │
      ▼
TradersPost Strategy (Options) → Your Broker (Paper first)
What You’ll Need
- TradingView Pro account (required) so you can run multiple alerts and avoid alert expirations.
- TradersPost Basic account (required). Your AlgoIndex subscription includes a coupon that gives you a TradersPost Basic Plan – for FREE – as long as you remain an active AlgoIndex client.
- A supported options broker (connected inside TradersPost) — TradeStation, Tradier, or Alpaca. Ensure options trading is approved on your account (incl. OPRA market data if your broker requires it).
Recommended: TradeStation — you receive a 50% commission discount coupon as an AlgoIndex subscriber. TradeStation has been extensively tested with our algorithm integration. - AlgoIndex subscription (AlgoAuto Automated Trading Plan) – provides access to the single invite‑only master script (All Stages). The master script includes presets for Stages 1–4 — you’ll load the same script on four charts and select the Stage per chart.
Part A – TradersPost Setup
Follow the exact order shown below (matches the screenshots). Start with AlgoIndex Stage 1, then repeat steps A3–A12 to create separate strategies and subscriptions for AlgoIndex Stage 2–4 (four total).
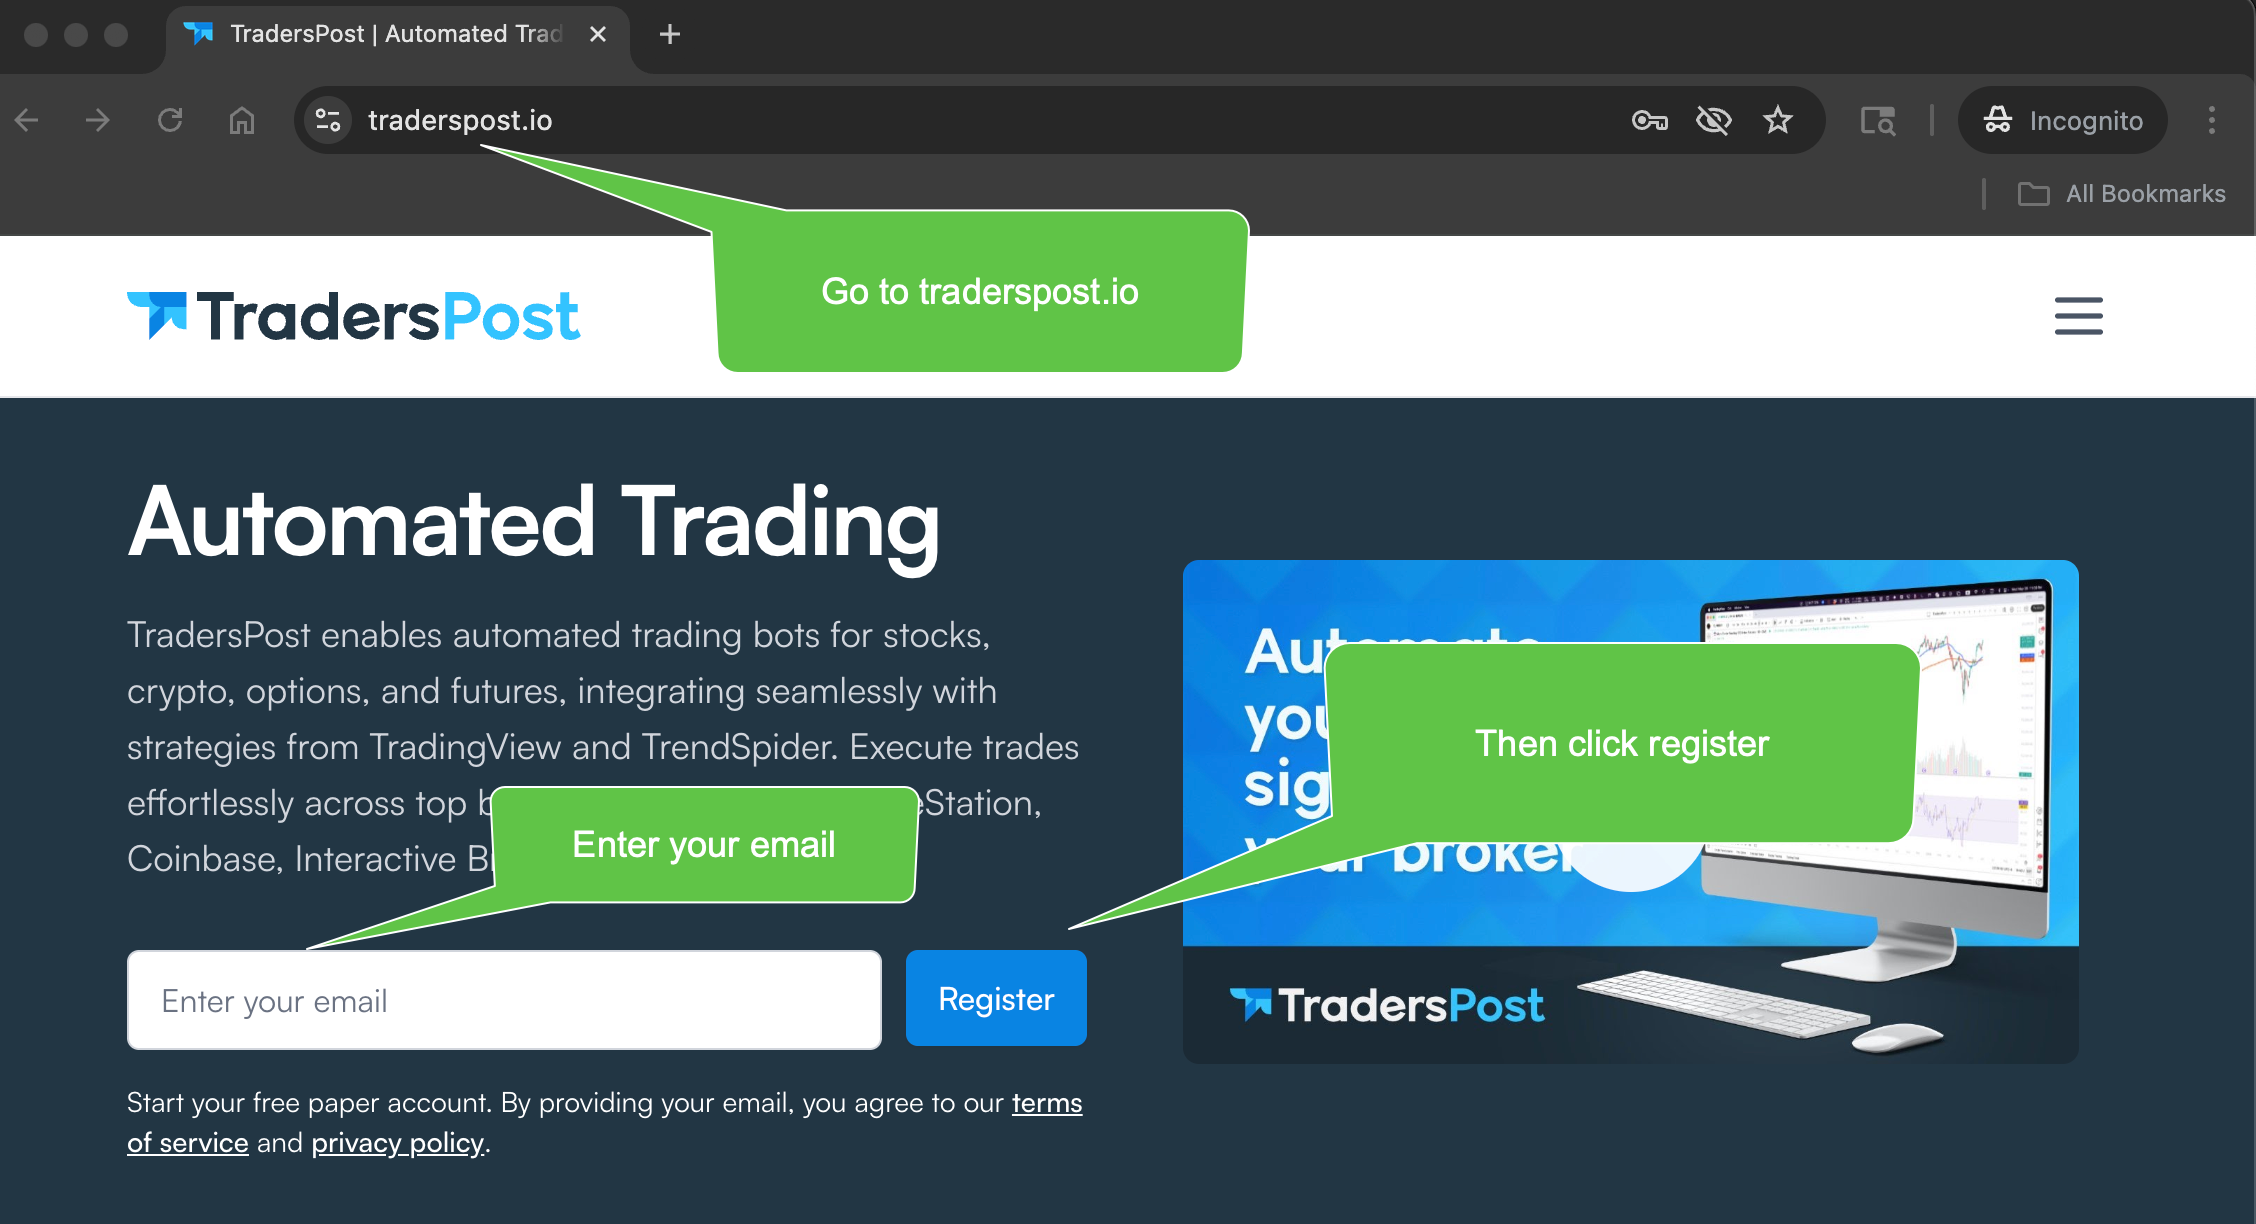
A1) Sign up at TradersPost.io
Go to TradersPost and start a new account.

A2) Complete the Account Setup form
Fill in your user details and required onboarding questions.

Do this: Provide name, phone, create password, select Options among assets, and choose Intraday for frequency (recommended). Agree and continue.
A3) Create your first Strategy
Open Strategies → click New Strategy.

Do this: You’ll make one per Stage later (AlgoIndex Stage 1…AlgoIndex Stage 4). Start with AlgoIndex Stage 1.
A4) Configure Strategy Details
Set the core fields for an Options strategy.

Summary:
- Name:
AlgoIndex Stage 1(later: AlgoIndex Stage 2/3/4) - Asset class: Options
- Enable: Allow auto submit, Allow live trading, Allow any ticker
- (Optional) Set risk limits (Max position size / Max orders per day)
- Save
A5) Connect your broker (TradeStation recommended)
Choose Live or Paper to link your broker.

Reminder: Select TradeStation (recommended: 50% commission discount with AlgoIndex coupon), or Tradier/Alpaca.
A6) Read and agree to the connection
Finish the authorization by accepting terms.

Summary: Review, then click I agree.
A7) Log in to your broker
Authorize TradersPost to access your account.

Summary: Enter your broker credentials and sign in.
A8) Subscribe to your strategy
Create a Subscription for this strategy so it can send orders to a broker account.

Summary: Click Subscribe to This Strategy.
A9) Choose your linked broker account
Pick the broker account you connected in A5–A7 (TradeStation recommended; Paper first).

Summary: Select your TradeStation Paper/Live account (or another supported broker).
A10) Create the strategy subscription
Confirm the broker/mode/asset class and create the subscription.

Summary: Click Create.
A11) Configure subscription settings
Tune the subscription so TradersPost routes entries/exits as intended.

Summary:
- Use signal settings: ON
- Name:
AlgoIndex Stage 1(later: AlgoIndex Stage 2/3/4) - Auto submit: ON (automation)
- Allow any ticker: ON
- Allow add to position: ON (if you plan to use adds)
- Leave order types/prices as Use Signal unless we specify otherwise
- Save
A12) Get your Webhook URL
Open the subscription and click Webhook, then copy your unique URL.


Summary: Click Webhook → Copy. You’ll paste this in Part C when creating your TradingView alert.
Why separate? Each Stage should have its own subscription & webhook. This keeps logs and risk limits isolated per Stage and makes troubleshooting simple.
A13) Repeat for AlgoIndex Stage 2–4 (make 3 more)
Create three additional strategies and subscriptions so each Stage has its own pair:
- Strategy Names:
AlgoIndex Stage 2,AlgoIndex Stage 3,AlgoIndex Stage 4 - For each Stage, repeat:A3 → A12
- A3–A4: New Strategy → Asset class Options → Save
- A5–A7: You can reuse the same linked broker from AlgoIndex Stage 1 (no need to relink), but you still authorize when prompted
- A8–A11: Create a Subscription for that Stage and turn Use signal settings, Auto submit, Allow any ticker ON (and Allow add to position if desired)
- A12: Copy the unique Webhook URL for that Stage (don’t reuse Stage 1’s URL)
Naming tip: Keep strategy + subscription names identical (e.g.,
AlgoIndex Stage 3) to avoid confusion. You should end Part A with 4 strategies, 4 subscriptions, and 4 different webhook URLs.
Part B – TradingView Setup (per Stage)
Do these steps on four separate charts/tabs so each Stage runs independently.
B1) Add the Script to Your Chart
- Open a new TradingView chart (use ES1!, 5‑minute chart only).
- Click Indicators → Invite‑only scripts → add the AlgoIndex All‑Stages master script (single script).

- Confirm the script plots/loads (you’ll see VWAP and other visuals once the session is open).
B2) Core Inputs to Set (Stage Tab)
Open Settings (gear icon on the script) and use only these public inputs:

Stage Mode
- Select Stage 1 / Stage 2 / Stage 3 / Stage 4 for this chart (5‑minute chart only).
Visuals (Public)
- Show VWAP
- Show Prior‑Day High/Low
- Show Session High/Low
- Show Round Numbers
- Show Bias Banner
- Show Trade Markers
Display Settings
- Inputs in status line (optional)
Trading Controls
- Order Qty (contracts) — start with 1 on paper
- Distance for Limit Order % — leave default unless instructed
- TP Underlying pts/% — leave default
- TP Options pts/% — leave default
- PNL SL (USD) and PNL SL On/Off — optional broker‑side protection
Trade Limiter Settings (optional)
- Trade Limiter On/Off
- Max Profit Trades per Session (default 1)
Session Settings (advanced — leave defaults unless told otherwise)
- Exchange Day Session (default
0930‑1600) - Custom Time Zone (default
America/New_York) - Session 1 window; Session 2 Enable/Session 2 (optional)
- Mon–Sun day toggles
Repeat B1–B2 for four separate charts/tabs, one per Stage.
Part C – Create the TradingView Alert (Order Fills → TradersPost)
Create one alert on each Stage tab.
- Add alert from the script: right‑click the script label on the chart → Add alert on AlgoIndexOS…

- In the alert window, open the Message tab:
- Alert name:
AlgoIndex Stage 1 → TradersPost - Message: paste exactly
{{strategy.order.alert_message}}

- Alert name:
- Switch to the Notifications tab:
- Check Webhook URL and paste the Stage’s URL from Part A12

- Trigger: Once Per Bar (or Only Once if you recreate daily).
- Click Create.
- Repeat for AlgoIndex Stage 2/3/4 on their own chart tabs.
Part D – First Run on Paper (Test Harness)
Perform this once per Stage tab.
- In TradingView → Alerts, confirm the Stage alert shows Active (no red/paused icons).
- When the next signal occurs, check TradingView → Alerts Log to confirm the alert fired for that Stage.
- In TradersPost → Activity/Logs, verify the strategy received the order and forwarded it to your paper broker.
- In your broker paper account, confirm the option order (OPRA format, e.g.,
SPY250927C...).
There is no manual “test order” toggle in the public build. Use paper first and verify the routing on the next legitimate signal.
Troubleshooting & FAQ
Q1) I see “invalid option symbol” or no fills.
A: Make sure your TradingView alert uses {{strategy.order.alert_message}} and the Webhook URL from the matching Stage subscription (Part A12). In TradersPost, confirm the subscription’s Instrument = Options and it’s linked to your broker account (TradeStation/Tradier/Alpaca) with options approval. Then retest on paper.
Q2) My add‑on (scale‑in) orders don’t trigger.
A: Scale‑ins are managed automatically by the strategy in the public build; there’s no toggle to enable/disable adds. If you don’t see adds, that simply means your trade didn’t meet the internal retrace conditions yet.
Q3) Do I need the charts open for alerts to fire?
A: No. Once alerts are created, TradingView runs them server‑side.
Q4) Positions didn’t close at the bell.
A: Check Session Settings. If Hold positions until options expiration is ON, positions can carry overnight to expiration; if you prefer flat by the bell, turn that OFF (and keep Close all orders/positions when Exchange Day Session is over = ON).
Q5) Can I configure stops or trailing in the public script?
A: The public build manages exits internally and does not expose stop/trailing toggles. If you need additional protection, use TradersPost risk controls (e.g., Max position size, Max orders/day).
Q6) How many alerts do I need?
A: One per Stage: a single Order Fills → TradersPost alert. With 4 Stages, that’s 4 total.
Q7) I don’t see visuals.
A: Make sure the session is open (public visuals display during RTH) and Show VWAP is ON in the inputs. On historical bars, some visuals may be simplified. On historical bars, visuals remain as guides.
Q8) Holiday half‑days?
A: Holidays and half‑days are handled automatically – no extra input required.
Join the Discussion
Connect with other ES futures and SPY options traders. Share setups, discuss levels, and get real-time market insights from our community.
Join AlgoIndex Trading Community